Use Case 4: Executing First AWS SageMaker Model with PySpark Notebook on SageMaker
To use the Qubole Spark cluster, you have to configure the SageMaker Jupyter Notebook instance.
Prerequisites
Ensure that the instructions mentioned under Configuring a Qubole Spark Cluster and Configuring AWS SageMaker sections are completed.
Executing First AWS SageMaker Model with PySpark Notebook on SageMaker
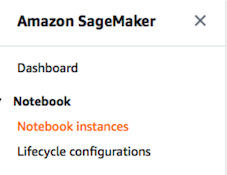
Login to AWS and go to SageMaker.
Under the Notebook section, click Notebook instances.
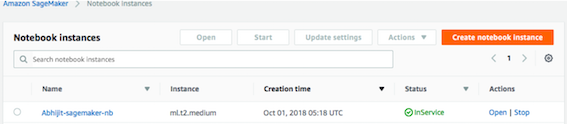
Click Create notebook Instance button.
Enter the Notebook Instance name, select the instance type as
ml.t2.mediumor higher, and role as IAM and VPC. Retain the default values for the remaining fields.Click the Create notebook Instance button to create a new Notebook instance. The new notebook will be listed under the Notebook instances section with a status as InService. Wait until status changes to InService as shown below:
Under the Actions column of the newly created notebook instance, click Open. A webpage is displayed in a new tab to configure the Jupyter Notebook.
On the new webpage for Jupyter Notebook, click the New drop-down list and select Terminal. A webpage with a terminal prompt is displayed.
Run
Is -alin the prompt and locate the.sparkmagicfolder.Run
cd.sparkmagic/command in the prompt.Check if the
config.jsonfile exists. If it is not present, click here to download.Run
vim config.jsoncommand in the prompt to open the config.json file with the Vim editor.Replace the URL value with the following:
https://api.qubole.com/livy-spark-<cluster_id>Note
You can find the Cluster id on the Clusters page. It is the same spark cluster configured in section Configuring a Qubole Spark Cluster section.
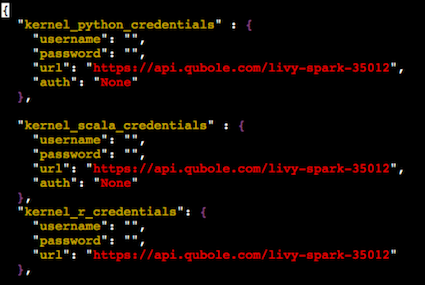
Specify the value for
custom_headersascustom_headers":{"X-AUTH-TOKEN": "<API-TOKEN>"},.Note
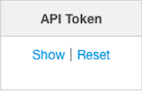
API-TOKEN is the API token of your Qubole account. To find it, go to Control Panel > My Accounts and click Show under the API Token column.
Close the
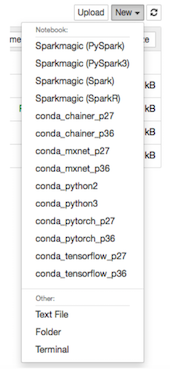
config.jsonfile. You have successfully configured the SageMaker notebook to use the Spark cluster on Qubole.Go back to the webpage for Jupyter Notebook. Click the New drop-down list and select Sparkmagic (PySpark).
Note
You can create each step as paragraph in Jupyter Notebook. Press Shift+Enter to run the paragraph. All the steps without
%%localare run on the Spark cluster to process the data with the help of the Spark cluster.Import the required libraries.
from pyspark.mllib.feature import HashingTF
from pyspark.mllib.regression import LabeledPoint
from pyspark.mllib.classification import LogisticRegressionWithSGD, LogisticRegressionWithLBFGS, SVMWithSGD, NaiveBayes
from pyspark.mllib.tree import DecisionTree, GradientBoostedTrees, RandomForest
from pyspark.mllib.evaluation import MulticlassMetrics
from pyspark.mllib.util import *
Import the data from S3 to clean and process with the help of Qubole. It prepares the data for training. In this example, the email data is in the text format and it will be classified either as spam or non-spam emails.
spam = sc.textFile("s3-bucket for spam email data")
ham = sc.textFile("s3-bucket for non-spam email data")
Split the words in the email.
spam_words = spam.map(lambda email: email.split())
ham_words = ham.map(lambda email: email.split())

print(spam_words.take(1))
print(ham_words.take(1))
Transform them into integers by hashing.
tf = HashingTF(numFeatures = 200)
spam_features = tf.transform(spam_words)
ham_features = tf.transform(ham_words)

print(spam_features.take(1))
print(ham_features.take(1))
Create the features from the transformed emails.
spam_samples = spam_features.map(lambda features:LabeledPoint(1, features))
ham_samples = ham_features.map(lambda features:LabeledPoint(0, features))

print(spam_samples.take(1))
print(ham_samples.take(1))
Split the data into train and test datasets.
Convert the data into the
libsvmformat to make it understandable to SageMaker.bucket_path="s3-bucket to store the processed data" prefix="spam-classifier/" training_set_directory="spam-classifier-training-data-svm" test_set_directory="spam-classifier-test-data-svm" training_set_path=bucket_path+prefix+"train/" test_set_path=bucket_path+prefix+"test/" MLUtils.saveAsLibSVMFile(training_data, training_set_directory) MLUtils.saveAsLibSVMFile(test_data, test_set_directory)
Upload the data in the
libsvmformat again to the S3 to make it accessible to the SageMaker notebook as these steps are run on the Spark cluster.from subprocess import call call(["/usr/lib/hadoop2/bin/hadoop", "distcp", "spam-classifier-training-data-svm", "s3://qubole-qa-defloc/abhijitj/SageMaker/"]) call(["/usr/lib/hadoop2/bin/hadoop", "distcp", "spam-classifier-test-data-svm", "s3://qubole-qa-defloc/abhijitj/SageMaker/"])
Define the training template for SageMaker to create a model. Ensure that you define a role for the following code.
%%local
from time import gmtime, strftime
job_name = 'spam-classifier-logistic-1-' + strftime("%Y-%m-%d-%H-%M-%S", gmtime())
role = "<define your AWS role here>"
create_training_params = \
{
   "AlgorithmSpecification": {
     "TrainingImage": container,
     "TrainingInputMode": "File"
   },
   "RoleArn": role,
   "OutputDataConfig": {
     "S3OutputPath": bucket_path + prefix + "output"
   },
   "ResourceConfig": {
     "InstanceCount": 1,
     "InstanceType": "ml.m4.4xlarge",
     "VolumeSizeInGB": 5
   },
   "TrainingJobName": job_name,
   "HyperParameters": {
     "silent":"0",
     "objective":"binary:logistic",
     "num_round":"100"
   },
   "StoppingCondition": {
     "MaxRuntimeInSeconds": 3600
   },
   "InputDataConfig": [
      {
       "ChannelName": "train",
       "DataSource": {
         "S3DataSource": {
           "S3DataType": "S3Prefix",
           "S3Uri": training_set_path,
           "S3DataDistributionType": "FullyReplicated"
        }
       },
        "ContentType": "libsvm",
        "CompressionType": "None"
    },
     {
        "ChannelName": "validation",
        "DataSource": {
          "S3DataSource": {
            "S3DataType": "S3Prefix",
            "S3Uri": test_set_path,
            "S3DataDistributionType": "FullyReplicated"
          }
        },
         "ContentType": "libsvm",
         "CompressionType": "None"
        }
   ]
}
Train the job in SageMaker. Update the AWS Access and Secret Keys in the following code.
%%local
import time
client = boto3.client('sagemaker', region_name='us-east-1')
client.create_training_job(**create_training_params)

status = client.describe_training_job(TrainingJobName=job_name)['TrainingJobStatus']
print(status)
while status !='Completed' and status!='Failed':
 time.sleep(60)
 status = client.describe_training_job(TrainingJobName=job_name)['TrainingJobStatus']
print(status)
Define the model.
%%local
model_name=job_name+"-model"

info = client.describe_training_job(TrainingJobName=job_name)
model_data = info['ModelArtifacts']['S3ModelArtifacts']

primary_container = {
  'Image': container,
  'ModelDataUrl': model_data
}

create_model_response = client.create_model(
   ModelName = model_name,
   ExecutionRoleArn = role,
   PrimaryContainer = primary_container)
Define an endpoint.
%%local
endpoint_config_name = 'spam-classifier-' + strftime("%Y-%m-%d-%H-%M-%S", gmtime())

create_endpoint_config_response = client.create_endpoint_config(
   EndpointConfigName = endpoint_config_name,
   ProductionVariants=[{
     'InstanceType':'ml.m4.xlarge',
     'InitialVariantWeight':1,
     'InitialInstanceCount':1,
     'ModelName':model_name,
     'VariantName':'AllTraffic'}])
Create an endpoint and host the model.
%%local
endpoint_name = 'spam-classifier-endpoint' + strftime("%Y-%m-%d-%H-%M-%S", gmtime())

create_endpoint_response = client.create_endpoint(
   EndpointName=endpoint_name,
   EndpointConfigName=endpoint_config_name)

resp = client.describe_endpoint(EndpointName=endpoint_name)
status = resp['EndpointStatus']

while status=='Creating':
  time.sleep(60)
  resp = client.describe_endpoint(EndpointName=endpoint_name)
  status = resp['EndpointStatus']
  print("Status: " + status)
print("Status: " + status)
Test the model to see its predictions.
%%local
runtime_client =  boto3.client('runtime.sagemaker', region_name='us-east-1', aws_access_key_id=access_key_id, aws_secret_access_key=secret_access_key)

spam_message = "23:2.0 27:1.0 30:1.0 34:1.0 42:1.0 45:2.0 61:1.0 70:1.0 71:1.0 74:1.0 87:1.0 100:1.0 104:1.0 107:1.0 108:1.0 127:1.0 130:1.0 160:1.0 169:1.0 183:1.0 189:1.0"
response = runtime_client.invoke_endpoint(EndpointName=endpoint_name,
                   ContentType='text/x-libsvm',
                   Body=spam_message)
result = response['Body'].read()
result = result.decode("utf-8")
print(result)

ham_message = "2:1.0 10:1.0 13:1.0 18:1.0 23:1.0 29:1.0 44:1.0 67:1.0 72:1.0 74:1.0 82:1.0 89:1.0 96:1.0 107:1.0 115:1.0 117:1.0 118:1.0 119:1.0 122:3.0 124:1.0 148:3.0 164:4.0 166:4.0 171:1.0"
response = runtime_client.invoke_endpoint(EndpointName=endpoint_name,
                   ContentType='text/x-libsvm',
                   Body=ham_message)
result = response['Body'].read()
result = result.decode("utf-8")
print(result)
You have successfully created a Machine Learning model with Qubole on SageMaker.