Manual Setup of a Qubole Account on GCP
This section describes the manual process for setting up a Qubole account on GCP. The user running this setup will need access to a service account and its associated JSON credentials file with permissions specified below.
Required Permissions for Setup
The user executing the manual script must be assigned the following IAM roles:
- Service Account Key Admin: To generate JSON keys for service accounts.
- Storage Admin: To create and assign read/write privileges on storage buckets.
The service account used to execute the manual script must have the following IAM roles:
- Service Account Admin: This role includes permissions for working with service accounts.
- Project IAM Admin: This role contains permissions to access and administer a project’s IAM policies.
- Role Administrator role: This role includes permissions to create custom roles.
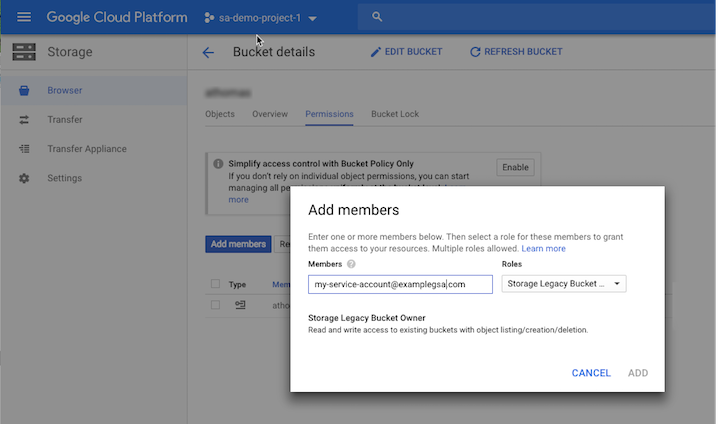
A new bucket with object-level and bucket-level permissions enabled needs to be created for the default storage location (defloc). The service account used to execute the setup must be assigned the Storage Legacy Bucket Owner/Storage Admin role on the defloc from the permissions tab on the bucket details page:
Note
At least one of the two roles Storage Legacy Bucket Owner and Storage Admin should appear in the IAM section of your GCP console. Add either of these roles to provide the permissions required for the default storage location.
Setup Process
In the QDS UI, go to Control Panel > Account Settings > Access Settings. For Access Mode Type, select Manual. Click Create QDS Service Account and note the Qubole service account created.
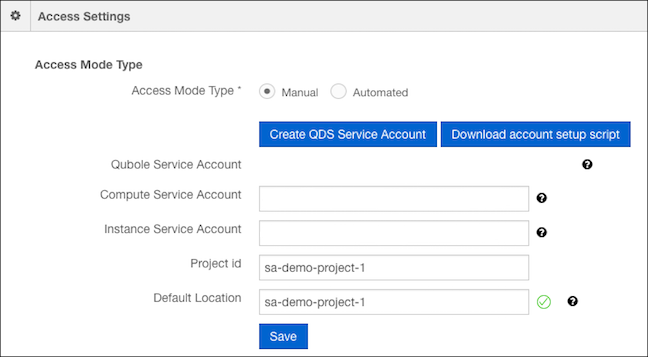
QDS will use this service account to make Google Cloud API calls.
Click Download account setup script to download the
setup_service_account.shscript for the setup process.Enter the project ID and the default location for storing Qubole data and logs (defloc).
You must provide the JSON credentials file corresponding to the service account you are using for this setup process as an input to the script. For information on creating a JSON credentials file, see Creating and managing service account keys in the GCP documentation.
Upload your credentials file and the downloaded setup script to Cloud Shell. For information on uploading files to Cloud Shell, see Using the Session Window in the GCP documentation.
Invoke the downloaded setup script using the
source command. The script usesgcloudandgsutilcommand lines, which are available as a part of the Google Cloud SDK. You should execute the script from a Google Cloud Shell under your GCP account, since all required Google Cloud SDK packages come pre-installed with Cloud Shell. For information on how to invoke Cloud Shell, see Starting Cloud Shell in the GCP documentation.
- Include these values specific to your GCP account:
- Your Qubole Service Account.
- Your JSON credentials file.
- Your project ID.
- A default location on Google Cloud storage that Qubole can use to store logs and processing output. This will be a URL of the form
gs://<path-to-bucket>.
Usage:
source setup_service_accounts.sh \
--qubole_sa=<qubole_service_account> \
--credentials_file=<customer_json_credentials_file> \
--project=<customer_ProjectID> \
--defloc=<google_storage_bucket_for_qubole>
Example:
source setup_service_accounts.sh \
--qubole_sa=qds1-618@testgcp-218818.iam.gserviceaccount.com \
--credentials_file=gcp-key.json \
--project=qubole-gce \
--defloc=gs://vs-test
In this example, gcp-key.json is the credentials file uploaded to the cloud shell.
- When you execute the setup script, two service accounts are created:
- A service account called Compute Service Account under the environment variable
$COMPUTE_SERVICE_ACCOUNT_FOR_QUBOLE. - A service account called Instance Service Account under the environment variable
$INSTANCE_SERVICE_ACCOUNT_FOR_QUBOLE.
- A service account called Compute Service Account under the environment variable
- Display the values of the newly-created service accounts with the echo command in Cloud Shell. Enter your values for the following fields in the QDS Control Panel in Account Settings > Access Settings:
- Compute service account
- Instance service account
- Project ID
- Defloc
Note
Qubole recommends that you also store the service account names in a secure place.
- Click Save to finish the setup of your account.
- Validation of credentials after Save:
- If your settings are saved successfully, you will see a message at the top of page saying, “Please wait while we validate your settings. This may take a few minutes.” Upon completion of the validation, your account will be fully operational.
- Qubole validates your settings in the background, so you can use the application while the settings are being validated, but you will not be allowed to update the access settings or perform any GCP operations, such as starting a cluster.
- Validation may take up to 5 minutes.
- If validation is successful, you will see a green check mark in the Access Settings section next to the Default Location field. If validation fails, you will see a red X in the Access Settings section next to the Default Location field.
Points to remember
- In manual setup (as with automated setup), Qubole creates two custom roles in your project: qbol_compute_role and qbol_storage_role. Do not modify or delete these roles from the project as doing so might lead to unexpected behavior.
- Every time access settings are saved in automated process, you must ensure that QSA has required permissions as mentioned above.